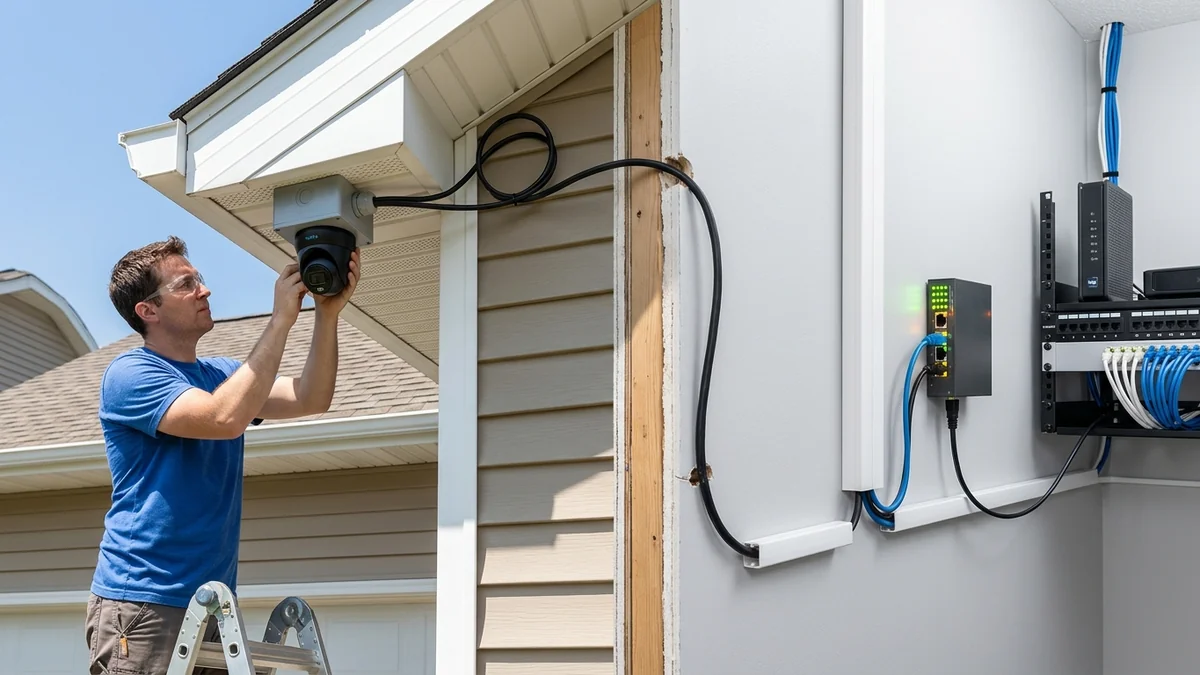
Power over Ethernet (PoE) IP security cameras are vastly superior to battery-powered or Wi-Fi security cameras: they deliver uninterrupted 24/7 recording at full 4K 30fps bitrate, zero battery swapping, and complete immunity to Wi-Fi deauthentication jamming attacks. Wiring your security cameras into a centralized PoE switch is simple and takes just a few hours. Here is the step-by-step masterclass.
1. 📐 Security Camera Wiring Topology Diagram
↓ (Outdoor Cat6 Cables)
[PoE Network Switch (Netgear GS308P 60W)]
└————┌
↓ ↓
[NVR Storage Box] [Home Router (Remote Viewing App)]
2. 🛠️ Step-by-Step Installation Walkthrough
- Mount security cameras under roof soffits or eaves to protect against direct rainfall.
- Run solid bare copper Cat6 cables from each camera back to your central network closet.
- Plug camera cables into the PoE-powered ports (Ports 1-4) on your PoE switch.
- Connect the switch's uplink port to your home router or Network Video Recorder (NVR).
3. 🔬 Weatherproofing & Outdoor Drip Loop Engineering
When running Ethernet cables to exterior security cameras, water can follow the cable jacket into the camera body. Always create a 6-inch Drip Loop below the camera mounting bracket so rainwater drips off the lowest point of the curve rather than entering the cable gland.
4. 🛠️ NVR vs Standalone PoE Switch Comparison
- All-in-One NVR with Built-in PoE: Easy plug-and-play, but ties all camera cables to the physical NVR location.
- Dedicated Standalone PoE Switch: Allows cameras to be powered in a central utility closet and streams video over the LAN to an NVR, PC, or cloud storage anywhere in the house.
5. 🔬 Lighting & Surge Protection for Outdoor Security Cameras
Outdoor security cameras mounted under metal roof eaves or exterior walls are vulnerable to induced atmospheric voltage spikes during thunderstorms. Always install an in-line Ethernet Gas Discharge Tube (GDT) surge suppressor bonded to your home’s electrical service ground before the cable enters your PoE switch.
6. 📝 Final Step-by-Step Security Camera Summary
- Calculate total camera wattage to verify it fits within your switch's PoE power budget.
- Use pure bare copper 23 AWG Cat6 outdoor waterproof cabling.
- Enjoy crystal-clear 24/7 4K 30fps security recording with zero Wi-Fi dropouts.
7. 🔬 Calculating Total PoE Power Budgets with Safety Headroom
Always calculate your total connected camera wattage and ensure your switch has at least a 20% power headroom buffer. For example, four 4K cameras drawing 8W each total 32W of power; pairing them with a 60W PoE switch (like the Netgear GS308P) provides 28W of reserve headroom for night vision infrared LEDs.
8. 💡 Complete Security Camera Installation Summary
With pure bare copper outdoor Cat6 cabling, proper drip loops, and a dedicated PoE switch, your home security camera system will deliver pristine 24/7 4K video recording for decades.
9. 🔬 Selecting Between Dome, Bullet, and Turret PoE Cameras
When designing your security layout, turret cameras offer the best balance of weather resistance and zero dome-glare reflection, while PTZ cameras require higher-power PoE+ (802.3at) to drive motorized pan-tilt tracking motors.
10. 💡 Final Installation Summary
With pure copper Cat6 outdoor cables, proper drip loops, and a dependable PoE switch, your DIY home security camera system will deliver uninterrupted 24/7 4K video recording for years to come.
11. 🔬 Waterproof RJ45 Gland Seals & Weather Resistance
When terminating exterior camera cables, always feed the cable through the camera’s rubber weatherproofing gland before crimping the RJ45 connector to ensure a watertight IP67 seal against driving rain and humidity.
12. 💡 Complete Surveillance Wiring Summary
With pure bare copper outdoor Cat6 cabling, proper drip loops, and a dedicated PoE switch, your security camera system will provide continuous 24/7 4K video recording with zero maintenance.
13. 🔬 Shielded Cat6 vs Unshielded for Outdoor PoE Wiring
For outdoor camera runs exposed to direct sunlight and lightning risks, Shielded Outdoor Direct Burial Cat6 (F/UTP) is recommended to drain atmospheric static charges safely into the grounded PoE switch chassis.
14. 💡 Complete Security Camera Installation Summary
With pure bare copper outdoor Cat6 cabling, proper drip loops, and a dedicated PoE switch, your DIY home security camera system will deliver uninterrupted 24/7 4K video recording for years to come.
15. 🔬 Surge Protection & Grounding Best Practices
Always connect outdoor PoE camera surge protectors to a verified earth ground to safely shunt lightning-induced voltage spikes before they reach your indoor network switch and recording equipment.
16. 💡 Complete Surveillance System Summary
With pure bare copper outdoor Cat6 cabling, proper drip loops, and a dedicated PoE switch, your DIY security camera system will deliver uninterrupted 24/7 4K video recording for decades.
17. 💡 Complete Surveillance Installation Checklist
- Plan camera coverage zones and cable pathways before drilling.
- Use solid pure copper 23 AWG outdoor Cat6 cables.
- Install drip loops and waterproof RJ45 connector glands.
- Connect all cameras to a dedicated PoE switch with ample power headroom.
18. 💡 Remote Surveillance Viewing Optimization
Connecting your PoE switch directly to a high-speed router port allows remote security camera viewing apps to stream high-bitrate 4K video feeds to your smartphone from anywhere in the world with zero buffering or dropped frames.
19. 💡 Grounding & Static Discharge Best Practices
Always connect your central PoE switch to a verified electrical ground outlet to safely discharge electrostatic build-up and protect your entire surveillance system during lightning storms.